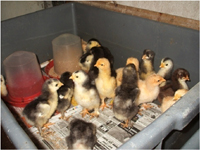
Rearing: dayold to 6-8 weeks With modern equipment, rearing chickens is a relatively easy process for the small poultry keeper to master. If you have a broody hen to do it for you, then all you will need to provide are chick crumbs, water and shelter against wind, rain and sun, preferably with a wired-over run so that magpies and crows cannot take the chicks or steal the food. Chick crumbs need to be in a container which the hen can neither tip over nor scratch them out of. Water needs to be in a container such that the chicks cannot drown, and put some grain feed for the hen out of reach of the chicks. She may break the grain into small pieces for them. Leave the hen with the chicks for about 4 weeks and then take her away, don’t take the chicks away as it will unsettle them or set them back and they need all the encouragement they can get. They can be transferred to a larger house and/or run when they are about 8 weeks old. Incubated chicks need a heat lamp to keep them warm, preferably one with an infra-red ceramic bulb so that they have heat and not light. The size of the bulb will depend on the number of chicks with a 100 watt one being sufficient for a few chicks and a 250 watt one needed for 50 chicks. The heat without light avoids feather pecking as they then have natural light and darkness to maximise body and feather growth. Site the heat lamp in a draught-free place with a generous covering of shavings or newspaper on the floor or make a circle using an 8’ (2.4m) length of hardboard about 18” (45cm) high around it.
You can also use a large rectangular cardboard box and change this for each hatch. It needs to be rectangular so that the lamp is at one end and the chicks can regulate their own temperature by moving away from the lamp. Turn the heat lamp on two days before the chicks are due to hatch. It should be far enough off the shavings so that the temperature under it is about 39˚C (102˚F). If the chicks are too hot they will scatter to the edges, panting. If they are too cold they will huddle in the middle, cheeping loudly and if they get severely chilled, they may get sick or die. The ideal is to have a small empty circle just under the lamp. Transfer the chicks from the incubator when they have dried and fluffed up. Provide a non-slip surface such as kitchen towel or a clean teatowel for the first couple of days in order to avoid splay leg: one or both legs stick out to the side. The ligaments take a day or so to strengthen and once splayed, it is difficult to return the affected leg(s) to the correct position. Dip their beaks in the drown-proof drinker (only use tepid water) and place them under the lamp. If they are thirsty and you give them cold water, the shock can kill them. Any chicks with deformities such as a crossed beak, rickets (poor nutrition) or bent toes should be culled at this stage and husbandry improved. Provide chick crumbs a short distance away from the lamp in a container which the chicks cannot scratch the feed out of. They can stay in this area either until they outgrow it or they are weaned off the heat lamp, at about 6 weeks. The lamp can be gradually raised and then turned off in the middle of the day if it is hot outside, not forgetting to put it back on at night. They should be well feathered by this stage and able to keep themselves warm, the lighter breeds feathering up quicker than the heavier ones. If you have used a light heatlamp, practice leaving this off at night if it is reasonably warm outside when the birds are about 4 weeks old so that they get used to the darkness, otherwise they could panic if you put them in a dark hut and smother.
|


